
VPN providers support a wide range of devices on which you’ll be able to install your Virtual Private Network. No matter what you want to do with it, you’ll still need to set it up correctly in the beginning.
We are going to show you how to install and set up your VPN on almost all possible devices (Windows, Mac, smartphones, Playstation, Router, Linux, and so on). Just check out our comprehensive guide below to find the right tutorial for you.
PS: on the right side of your screen you have the table of content which enables you to directly jump to the relevant part that you’re looking for.
In most cases, installation is quick and easy, only taking minutes to complete before you can enjoy the benefits of a VPN service.
Steps to Set Up Your VPN on Windows
Be it a free or a paid VPN for Windows, installing a Virtual Private Network on Windows is extremely easy. Of course, we highly recommend you choose a paid provider as free providers cannot offer the same comprehensive features as paid providers.
Are you ready to begin? Simply follow the steps outlined below.
1. Choose a VPN Provider
It goes without saying the first thing you have to do is choose a provider.
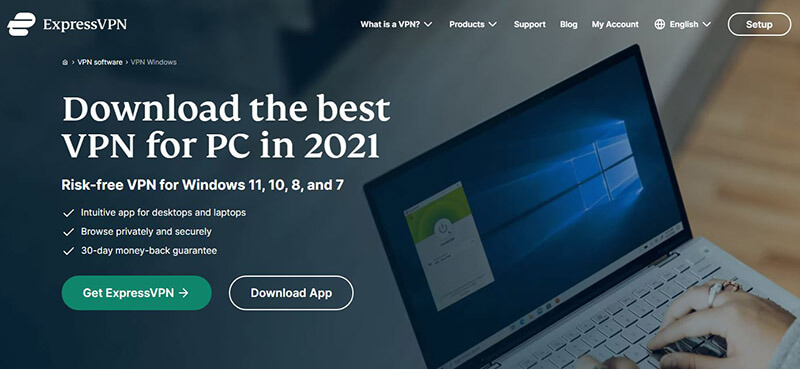
ExpressVPN: #1 VPN for Windows >
A good choice of provider for exceptional reliability, speed, and features offered is ExpressVPN. However, alternatives you might want to consider are NordVPN and CyberGhost.
2. Choose a Subscription Plan
So, sign up for a plan with your chosen provider. The biggest savings are made with yearly or longer plans. However, you can also pay monthly. For example, with ExpressVPN, you can save 49% compared to paying monthly and get three months free if you go for a 1-year plan.

Sign up for your plan and then continue to set up your VPN on Windows.
3. Download the Windows App
Next, sign in to the account you just made with the provider and then go to the setup or download page of the website.
At this stage, make a note of the activation code you are given. You will need this code after you have installed the app on Windows to activate the product.
4. Go Through the Setup Process
Find the app you just downloaded – normally it is in the “Downloads” folder on Windows PC. Double click the file to launch it and go through the setup process to install the app.
A window will pop up asking if you want the app to make changes to Windows, you should click “yes”. The setup of your VPN on Windows will continue and you should click “Continue” on any additional screens that pop up.
Once installed, the app will ask you for the activation code, so copy and paste it or type it in, and click “Sign in”. The installation is now completed and the dashboard opens up.
5. Choose Your Server
Next, go ahead and choose a server to connect to using the dashboard. In the screenshot below, we show the dashboard from ExpressVPN, but others will be similar.
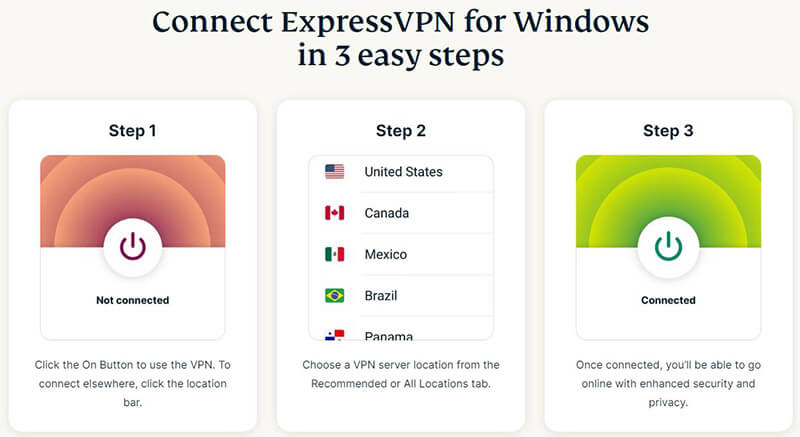
Once you have chosen a server click on the “Connect” button. Remember to minimize the dashboard and leave it running in the background to enjoy all the benefits offered. When you want to use the VPN in the future, all you need to do is find the icon for the app and click on it to reach the dashboard.
Congratulations – you have now completed the set-up of your VPN on Windows and are free to enjoy the many benefits.
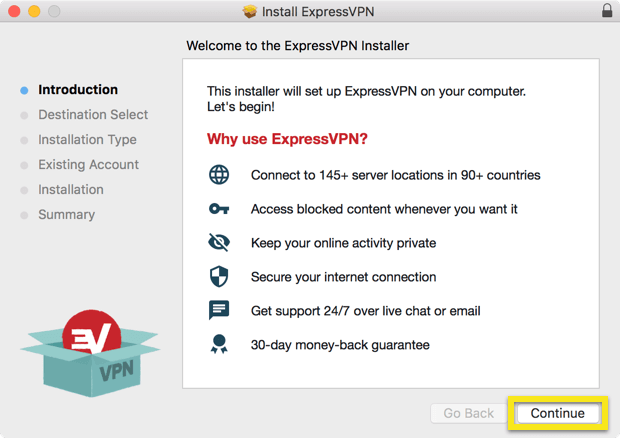
Install and Set-up your VPN on Mac
Check out the guide below to install your VPN on Mac OS.
1. Choose the Provider
First, choose your provider and a plan, and then continue this guide by following the steps outlined.
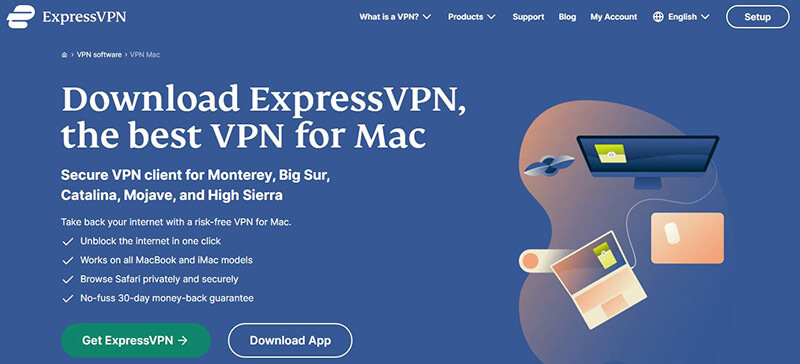
Install ExpressVPN on your Mac now >
2. Download the VPN App on Your Mac
Go to the setup page of the provider. Alternatively, check your email for a link to the page. The provider should send you details of your plan via the email address you used when signing up.
Sign in to your account on the website.
You can now hit the “Download for Mac” button to download the file onto your Mac. You will need to make a note of the activation code, so copy it using the button.
3. Install the App on Your Mac
Once downloaded, you can go ahead and click on the file to start the installation. When installing on Mac, a window pops up telling you the software will determine if it can be installed.
Just click on the “Continue” button.
You will then be asked where you want to install the app. You can leave the default installation location as it is, or change it, depending on your preference. When ready to go ahead and set up your VPN on Mac, click “Install”.
The installation will go ahead and a window will popup telling you the installation was successful.
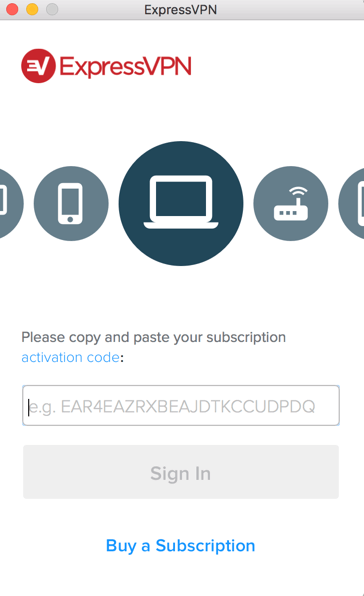
4. Sign In
When the installation is completed, the dashboard will popup so go ahead and sign in to the account you made after pasting your activation code into the box.
5. Use the Dashboard to Choose a Server
You can use the dashboard to choose a server. Most apps from providers choose the best server for your location automatically. However, you can always choose a specific country and server if you desire.
Once you have chosen your server click on “Connect”.
Congratulations, you have completed the setup of the VPN on Mac and you can enjoy all the benefits. In the future, just find the VPN icon and click it to open the dashboard.
Setup Your VPN on Linux
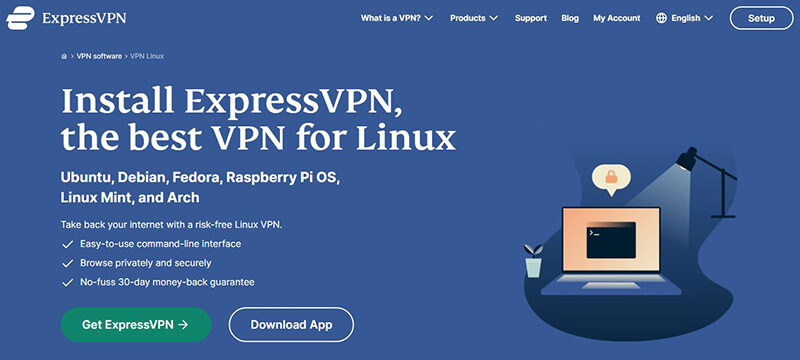
Setting up a Virtual Private Network on Linux is a little more complex than on Windows or Mac but do not worry – we are going to show you how to do it step-by-step.
You can set up your VPN on Linux for CentOS, Debian, Fedora, Mint, and Ubuntu. Remember – ExpressVPN offers 49% savings on a 1-year plan, so it’s our recommended choice.
Save 49% with ExpressVPN for Linux >
To start, choose a VPN provider and sign up for a plan. When you have done this, follow the guide step-by-step below to install and set up your VPN on Linux.
1. Choose the Installer for Your Linux Version
Go to the website of your chosen provider and sign in using your email and password. Go to the download or your dashboard page and choose the correct installer for your version of Linux.
Our example is with ExpressVPN that we highly recommend.
If you are unsure of which version of Fedora or Ubuntu you have, you can find out by heading to the terminal and typing in the following, “uname –m” or “arch”.
2. Install the VPN App on Linux
You may be able to run the installation directly, or you can use the command line to install the app.
If you are using the command line for installation, follow the steps below:
- Go to the installer file in the folder you downloaded it to, for example – cd ~/Downloads/
- When inside the folder run one of the following commands depending on your distribution
- For Ubuntu/Debian/Mint use, “sudo dpkg -i [installer filename]”.
- For Fedora/CentOS use, “sudo yum install [installer filename]”.
3. Activate the VPN
The next step to set up your VPN on Linux is to open a new terminal window then run the command “expressvpn activate”
You then need to paste or type the activation code you made a note of earlier into the terminal window.
4. Make a Server Connection
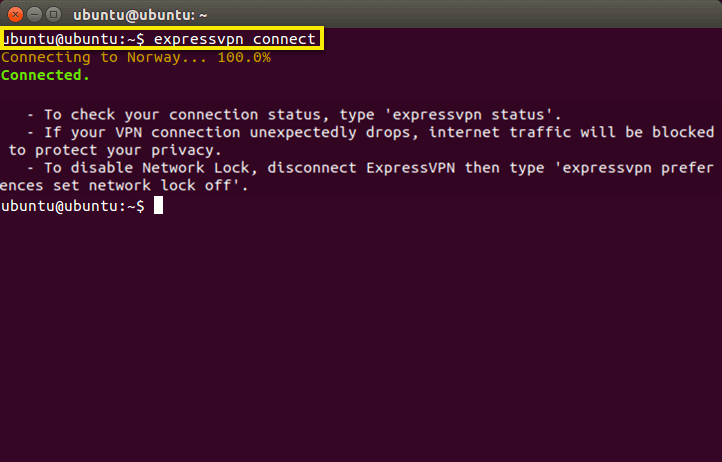
Once more open up a terminal window and type in the following, “expressvpn connect”. The app will connect to the last server you connected to, but if it is the first time launching the command, the app will choose a smart location.
You are now behind the security of the VPN, congratulations.
5. More VPN Terminal Commands for Linux
If you want to disconnect from the server type in, “expressvpn disconnect”.
To see a list of locations that are recommended type in “expressvpn list” or to see all locations type in, “expressvpn list all”.
You can also choose a specific location by typing in, “expressvpn connect [LOCATION]”. Of course, change “location” to the location of your choice, for example, the USA, UK.
6. Choosing Different Protocols
Choosing a different protocol to OpenVPN might give faster connection speeds. To set up a VPN different protocol, you can switch between UDP and TCP, with the app choosing the best protocol for your needs.
To change to TCP open the terminal window and type in, “expressvpn protocol TCP” or to switch to UDP type in, “expressvpn protocol UDP”.
If you disconnect from the server or change to a different protocol, do not forget to use the terminal window to connect to a server again to continue protection.
Install and Setup Your VPN on a Router
There is one huge benefit when you set up your VPN on a router. Any device that connects to the internet through the router enjoys the protection and benefits of your subscription plan.
Protect all devices with ExpressVPN >
This means that you do not have to install apps on different devices, for example, your Windows computer, PlayStation, and phone. Simply connect to the internet using the devices through the router.
To benefit from this, follow the guide below to install your chosen VPN on your router.
First, choose your provider and a plan. Great savings are made if you pay upfront for a year or more. After signing up, follow the guide below to install and set up your VPN on your router.
1. Sign In to the VPN Account
To set up your router, you need to log in to the account you made with your chosen VPN. In this example, we chose ExpressVPN but the setup with other providers will be similar. Be careful – not all VPN providers let you install your Virtual Private Network on the router.
Make a note of the activation code assigned to you.
2. Choose the Firmware for Your Device
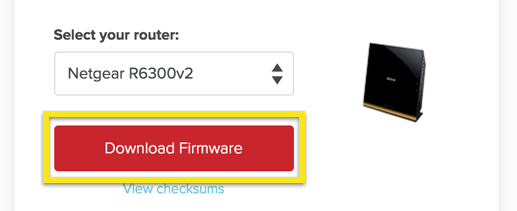
On the set-up page, choose “Router”, and choose the specific firmware for your router. Click on “Download Firmware” to download it to the computer.
3. Open Your Browser and Visit Your Router Configuration Page
Using your web browser, open up the configuration page for your router and sign in using the user name and password provided by the ISP. You will then arrive at the dashboard page for your router.
Then, follow the steps below:

- Go to the “advanced” tab or similar depending on the manufacturer of your router. In this example, we have a Netgear router;
- Go to the “administration page” and choose “router update”, then browse to find the firmware file you previously downloaded. Upload the file and this flashes the router with the firmware;
- Restart the router.
You now have to make sure you are connected to the router.
- If you connect to the router through a cable, you will be connected
- If you use WiFi, look for the router network and make a connection to it.
You can now go ahead and set up the VPN using the router dashboard.
- Click on “get started”
- Type in the ISP username and password and “click connect”
- Type in the activation code or copy and paste it into the box and “click continue”
- Now choose a router admin password and “click done”.
- The app chooses the best server for your location and any device connected through the router is protected by the VPN
- You can also choose a server through the router dashboard.
So, now that you know how to set it up, check our ranking of the best VPNs for routers – all offer superb protection and good value for money.
How to Setup VPN on Your Phone or Tablet?
Setting up a VPN on an Android or iOS phone (iPhone) or tablet (iPad) is very easy. First, choose a provider – again, we highly recommend ExpressVPN.
However, NordVPN and CyberGhost are also good choices for Android and iOS. Sign up for a plan with the provider and make a note of the activation code, then sign in to the account you just made and continue the guide below to set up your VPN.
1. Visit the Setup Page on the Providers’ Website
Head to the setup or download page of the provider you chose and choose the correct app for the device. For instance, Android or iOS (for your iPhone or your iPad).
Install ExpressVPN on Android and iOS now >
You can either download the app from the link to the Google Play Store or App Store or download the APK file and sideload it onto your handset.
To sideload an app, you can:
- Download the APK file to your computer;
- Connect your device to the computer and transfer the file onto your device;
- Alternatively, you can upload the APK file to cloud storage such as Dropbox and then download it onto your phone through the Dropbox app.
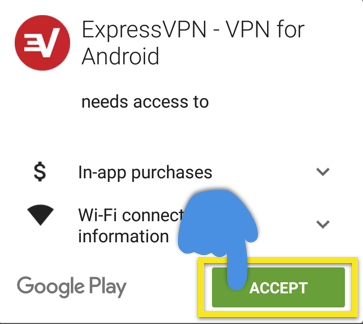
2. Install the App
Install the app by either clicking on “install” from the Google Play Store (for Android), App Store (for iPhone and iPad), or by finding it on your device after sideloading it through a computer.
Once installed, “click open” if you downloaded and installed through Play Store or App Store, or click on the icon left if you sideload the app.
3. Sign In to the App
When the app opens, you can now sign in to your VPN account to configure it. Enter your username and password and go through any additional screens by clicking “Ok” or “Continue”.
4. Use the Dashboard to Choose a Server
You can now choose a server from any location by clicking on the icon below the connect button. When you have chosen a server click on the “Connect” button and it turns green to signify you are connected.

That is all there is to it, just leave the app running in the background and you are protected.
How to Set up VPN on PlayStation
Installing a VPN on a PS4/PS5 is a bit trickier. But no worries, we will guide you step-by-step.
Part 1: Manage Your Hostname
You can easily install your VPN on a PlayStation to use MediaStreamer by checking out the steps below. This guide is in three parts, first obtaining a hostname, then the setup of a VPN on the PlayStation, and registering the hostname with the VPN.
Again, we have chosen ExpressVPN as our provider. However, installing the VPN on PlayStation with other providers should be similar.
By changing the DNS settings of your console, you can stream from a wide choice of popular websites using the PS4/PS5.
1. Get the DDNS Hostname
You can fill in the DDNS hostname using the Dynu free service. Create an account on the website.
2. Verify Your Email Address
Verify your email address with Dynu, then, using the control panel, choose “DDNS Services”.
3. Add a DDNS Service
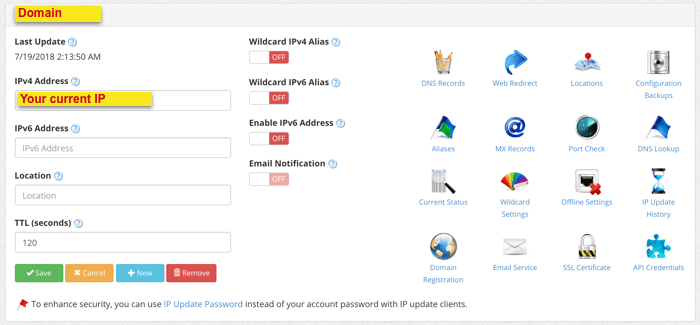
Click on “+Add” to add a DDNS service. Enter a hostname in the box entitled “Option 1: Use our Domain name” if you do not have a domain name. If you have your own domain name you should enter this in “Option 2: Use your own domain name”.
When you have completed the above step, you will see your current IP address and hostname on the left-hand side of the panel.
This part of the setup is complete and you can move on to the VPN set-up.
Part 2. Install the VPN on Your PS4/PS5
Now that we have finished step 1, we can go on with the next step, which is way easier!
1. Sign Up With a VPN Provider
Sign up with your chosen VPN provider and choose a plan, then move on to the next step.
2. Sign In to Your VPN Account
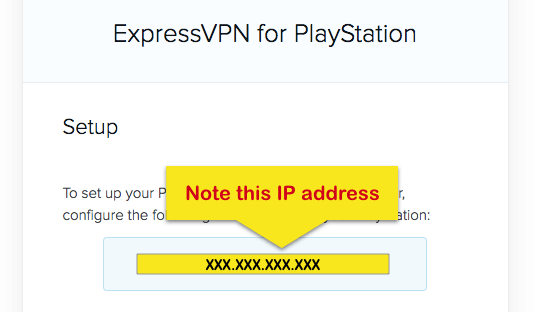
Sign in to your VPN account and head to the “setup” or “download” page. If you cannot see PlayStation listed, look for more devices and then PlayStation. Make sure you make a note of the MediaStreamer DNS server IP address at this point.
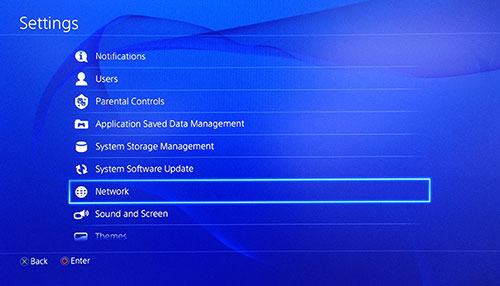
3. Go to Your PlayStation Settings
Go into the settings on your PlayStation and choose “network”. Click on it and then choose “Set up Internet Connection” on the next page.
4. Choose Wi-Fi or LAN Cable
Choose how you use the internet connection, Wi-Fi, or LAN, then continue.
5. Set Up Internet Connection
Follow the instructions below to set up the internet connection on your PS.
- On the next page choose “custom” when asked how you want to set up the internet connection;
- For the IP address settings choose “automatic”;
- For DHCP Host Name choose “Do not specify”;
- Choose “manual” for DNS settings;
- Select “primary DNS”;
- Type in your MediaStreamer DNS which you should have made a note of earlier and then choose “Done”;
- There is no need to change the secondary DNS;
- For the MTU settings choose “automatic”;
- For proxy server select “Do not use”;
- Choose “test internet connection”
- Finally, restart the PlayStation and the DNS changes are applied. To do this you can press “Up” on the D-pad, Choose – “Power – Turn off PS4/PS5”.
You now have to register the hostname you created earlier on the VPN website. To do this, follow the steps below.
- Sign in to the account you made with your chosen VPN provider
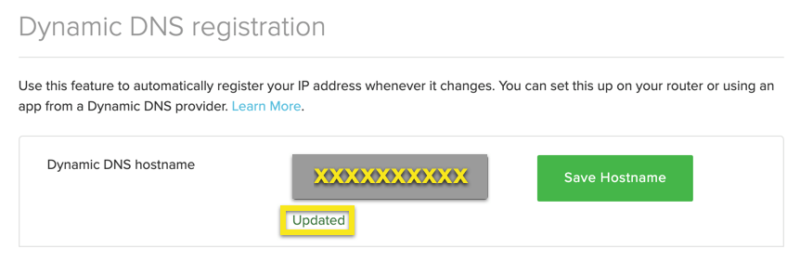
- Using your account dashboard choose “DNS settings”
- Find where it says “dynamic DNS registration” (if you choose ExpressVPN it will look like the one below). Type in the hostname to register and “click on save hostname”. It may take a few minutes for this to update.
Congratulations, you have now completed the setup of the VPN for PlayStation. You will now be able to stream content using your PlayStation and enjoy a smooth experience without ISP throttling.
Set Up a VPN on Your Smart TV
You can install a VPN on various Smart TVs – just follow our guide below to do it.
To use MediaStreamer using a VPN on your SmartTV, you can follow the first three steps outlined above for creating a DDNS hostname for the PS using Dynu free service.
Once you have created a DDNS hostname, continue the guide to set up your chosen VPN on your SmartTV below through the website of your provider.
1. Sign In to Your VPN Account
First, sign in to your account with your VPN provider and head to “settings” on the dashboard.
2. Dynamic DNS Registration
Find “Dynamic DNS registration” then type in the hostname and save the hostname. You will get a notice when the update has taken place.
You can now go ahead and configure settings for your SmartTV so the VPN will work with MediaStreamer.
- Use the “menu button” on your TV remote control to go into the main menu;
- Choose “network” then “network status” and click “enter” on the remote control;
- Your SmartTV will check your internet connection and then list some options. Go to “IP settings” then click “enter” using the remote;
- In IP settings choose “DNS setting” and click “enter”;
- Choose “enter manually” and enter your MediaStreamer server address. Finally, click “enter” to save the settings and the TV will make a check of the internet connection again. If all has gone well you will get a message saying you are connected to the internet.
- Click on “close” using enter on the remote control.
Stream lightning-fast with ExpressVPN now >
Congratulations, pat yourself on the back, as you have now completed the setup of the VPN on your SmartTV.
In Conclusion
Well done, we hope we have been helpful in showing you how to install and set up a VPN on your device. Whether you’re using a Mac, a Windows, an Android or iOS smartphone or tablet, or even a Playstation, a router, or a smart TV, you should now know how to set up your VPN on it.
As ExpressVPN, NordVPN, and CyberGhost all offer an extensive range of apps for almost all possible supports, we could not possibly cover them all here. However, all providers offer helpful advice on the relative webpage, so check them if you need further advice.
You can also leave us a comment if you want us to create a comprehensive guide to manage the configuration of your VPN on a specific tool or gadget.
FAQ
? Do I need to install a VPN on every device?
It depends on what you want to do. But very clearly, it is extremely interesting to have your VPN installed on your computer as well as your smartphone. After that, it will also depend on the devices you have.
If you have a tablet, a gaming console, a smart TV, do not hesitate to take advantage of your VPN on it.
? Can I install a VPN on my router?
Obviously, but be aware that this is not possible with all VPNs. The best VPNs usable on routers today are ExpressVPN, CyberGhost, and NordVPN.
? Are VPNs a waste of money?
Absolutely not because you will be able to do a lot of things with a quality VPN. For example ensuring your online privacy, unblocking censored content, taking advantage of all Netflix catalogs, downloading torrents anonymously, and much more.
Do not hesitate to read our article on the advantages of a VPN for further information on the subject.
? Should I leave my VPN on all the time?
It depends on what you plan to do during the day but in our opinion, it is better to activate your VPN only when you really need it. But after all, it is really up to you.

A professional writer with a Master’s degree in Mechanical Engineering. Since his youngest age, he loves everything related to internet, technology, fitness, games, and dogs! He joined our team in order to bring his deep knowledge in security services, among which VPN is of course a key component.